
Free Inquiry #1: Lofty Goals
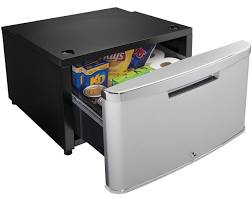
So my Inquiry has been quite backlogged due to having switched midway through the semester. My original plan was a carpentry project. I wanted to make a storage pedestal for my fridge. This would have a twofold benefit:
- it would give me a good place to store my onion and potatoes, this would be ideal because it would be a dark cool place
- It would raise up the fridge so that the crisper is less difficult to get into
I saw a similar object for sale at Home Depot but the style did not match my appliances and home decor.
Since I couldn’t find one that I liked I figured that I might as well make one myself with all the extra time I would have from being in online classes (how naïve I was).
This is one of the designs that I found, 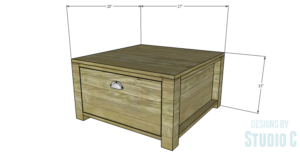
This design from Designs from Studio C was almost exact what I needed with the exception of the depth which needed to be extended by 4 inches, The design came with a full materials list
MATERIALS:
- 1-1/4″ pocket hole screws
- 1-1/4” brad nails
- Edge banding, optional
- 2 sets of 24″ Drawer slides (<– affiliate link!)
- Cabinet pulls
- Wood glue
- Sandpaper (100, 150, 220 grits)
- Finishing supplies (primer & paint, or stain, sealer)
LUMBER:
- 4 – 1×3 at 8′
- 1 – 3×3 posts at 6′ OR
- 2 – 3×3 posts at 3′
- 2 – 4′ x 8′ sheets of 3/4″ plywood
CUT LIST:
- 8 – 3×3 posts at 14-1/4″ – Legs
- 4 – 3/4″ plywood at 11-1/4″ x 23″ – Side Panels
- 8 – 1×3 at 23″ – Side Framing
- 2 – 3/4″ plywood at 11-1/4″ x 22″ – Back Panels
- 8 – 1×3 at 22″ – Back Framing & Front Stretchers
- 2 – 3/4″ plywood at 27″ x 28″ – Top
- 2 – 3/4″ plywood at 19-1/2″ x 22-1/2″ – Drawer Box Bottom
- 4 – 3/4″ plywood at 10″ x 22-1/2″ – Drawer Box Sides
- 4 – 3/4″ plywood at 10″ x 21″ – Drawer Box Front & Back
- 2 – 3/4″ plywood at 11″ x 21-3/4″ – Drawer Fronts
With all of this being detailed I figured that this would be easy as pie…. it was not. But that is a story for next time.