Free Inquiry #7

Inquiry #7: Reflection and Extension

Here are some reflection questions that I have answered in audio form.Β  I thought this would be a fun interview style format for my last post.

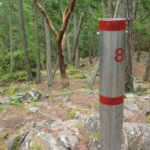
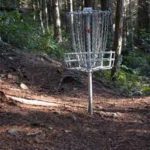
What did I learn about Free Inquiry through my exploration in disk golf?

In what ways did technology affect my learning?

Part 2

Extension: In what ways would I like to use technology to continue my learning?

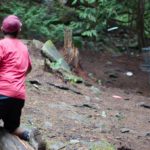
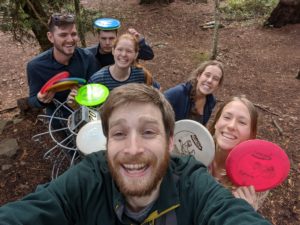
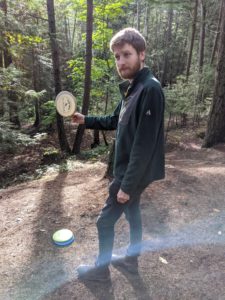
One of the aspects that made this project so enjoyable was that I was able to do it with friends. I really do have to give a big shout-out to my friend Mike who was a champ and helped me practice endlessly and gave lots of good tips. I have an amazing video of Mike giving some actual good advise while David pokes fun at him:


Easily my favorite line is “Should I look with my eyes or with my heart,” and really I think we all have that same question David…

While some of the computer tools we learned to use this semester didn’t come into play for this inquiry (unless we start making discs on the 3D printer), I definitely used applied the more conceptual ideas we touched on. I feel like I hit all the points a good inquiry needs to have: Orientation, Conceptualization, Investigation, Conclusion, and Discussion

  1. Orientation: this was initially a little shaky as I did not flip-flopped around before solidifying my topic
  2. Conceptualization: My inquiry question was essentially: how do I best improve.
  3. Investigation: I used a variety of digital and in person resources to research and investigate technique and how best to refine my abilities.
  4. Conclusion: These blogs (most especially this one) have acted as my way of reflecting on what I have learned and attempted to apply each week. Whether these be successes, failures, or musing, they have all added to my greater understanding.
  5. Discussion: This is the next step going forward. After sharing this blog with my peers and getting a chance to relax and read theirs, I hope that we will all get a chance to discuss our experiences over the last 3 months.

Hopefully their projects were as fruitful and entertaining as mine.

Free Inquiry #6

Free Inquiry #6: A Change of Scenery

For the Thanksgiving weekend I decided that a safer bet would be to pass on a family gathering this year. Instead I elected to have a Friendsgiving. This involved bundling up my whole bubble and going to the family Cabin on Pender. This was a nice change of pace from long stints I had been spending sitting at my dining room table staring at a screen. Also it gave me a chance to visit the Pender Island Disk Golf Park. This park is actually where I first started playing many summers ago. It was only recently when I found out that Victoria had its own course that I started playing more earnestly.

I thought it would be a nice time show off each of the courses and do a little comparison of them.

The local course in Victoria is located just off Millstream road. It has 18 holes which consist of either hanging metal rods or sheet metal wrapped stakes. Due to the limited size of the lot, the holes are oriented so that they overlap one another. This means that you have to keep your wits about you while you play.

As you can see there are clear fairways in many of the courses, although you can always be daring and attempt to cut through the trees. Some of the holes are elevated which forces you to shoot uphill, downhill or across gullies.

The Pender island course is located on South Pender. There are 27 holes (3 sets of 9) with a combination of pole style holes as well as cage nets.

As you can see there isΒ  a large variety in the kinds of holes seen. Some are quite rocky while others are level and flat. There was one hole that included a 20 meter vertical gain from start to finish. There are also holes that use the trees in interesting ways (see the arbutus caged hole in the gallery above)

The very best thing about the Pender course is that I got to do it with friends.

Free Inquiry #5

FreeΒ  Inquiry #5: Nailed the Hammer

So the third big skill I wanted to look at is the overhand throws, the Hammer/Tomahawk and the Thumber. These are useful throws as they can be down more easily when there is less room for a walk-up to your throw. Additionally when there are a lot of trees it gives the disk a more narrow profile initially, which can be good for sneaking in between trees.

This video by Karl Molitoris shows one of the more interesting aspects of this throw. As the disk is launched it has a tendency to rotate so that it is flying level through the air. This means that you can get that initial punchy throw that flips and then glides quite well. If the disk is unimpeded a tomahawk throw will ultimately curve to the thrown arm side (for me the left) while the thumber will go to the opposite side (for me the right).

Since my forearm throw is relatively weak, this offers me an alternative that I have been fairly successful with. Using these throws give me a far more reliable and competitive game, but may hamper the developments of my other skills. While I can use these throws for a variety of purposes it may be a better idea to practice the other skills which have a greater potential in other situations. for example if I needed to throw a fair distance on an upward angle this throw is not ideal as it has a tendency to follow a more artillery trajectory.

Commentary provided by David Heintz.

You can see here that my initial throw was trying to sneak through some trees but they were a little too tight. So I took a second throw aimed towards a safer area to play out of. Usually you wouldn’t get a second throw but we give ourselves a mulligan throw from the tee once perΒ  9-holes. This was mine.

Free Inquiry #4

Free Inquiry #4: Forehand? I only have Twohand.

Because I am left handed, I must approach many of the hole slightly differently. Where others would use a powerful backhand throw to curve around a patch of trees, this would be inappropriate for me. So I had to develop my forehand throw rather early on.

Here is a quick tutorial for how to do this throw:

Fortunately this throw uses many of the principles that I am familiar with from martial arts. Its almost as if body mechanics is universal…weird. For this throw it is important that you not restrict your motion with closed hips. We create motion and momentum with the X-step and then open the hips and allow the torque we have generated to be translated from our legs and hips to our throwing arm.

For me this throw is at best inconsistent. Aside from my shoddy aim, the real difficulty is keeping the throw flat. As of yet this is a skill I lack. On the occasions that I have successfully implemented the throw, the results have been quite satisfactory. That being said even the most beautiful of shots has a 50% percent chance of going straight into a tree.

Here is an example of that:

Mike deserves this for being so cocky with this throw.

Free Inquiry #3

Free Inquiry #3: Backhand, the Best hand?

So for my first post about skills I thought it a no brainer to look at the throw most people start with, the backhand.

But before I get into that I have someone to introduce:

This is Mike. He is my friend from the Primary Education Program and my personal disk golf guru. We consistently play up at the Millstream Disk Golf Course. He will be making lots of appearances throughout my posts as I tend to take more pictures of him than myself.

The Backhand:

via GIPHY

The big thing to remember with a back hand throw is that it will curve towards to one side at the end of the throw (above). For right-handed people a backhand throw will curve to the left. For me (a southpaw thrower) these will always curve to the right, unless a very fancy disk is used.Β  I found out quite early on that when making a backhand throw you must:

  • throw the disk levelly (this allows the disk to glide)
  • you must adjust for the curve of the disk
  • you if you aim too high the aggressiveness of the curve is increased

My biggest issue with this particular throw is the power-to-accuracy ratio. I am able to get the disk to fly a fair distance, but at the expense of any sort of precision. This is unfortunate because the power doesn’t mean much if it goes 90 degrees off of where the intended direction was. Mike told me that the secret to a good backhand throw is getting a little snap of the wrist which gives the disk more spin than if you just throw with your arm. This is something I will need to practice in the coming weeks.


Free Inquiry #2

Free Inquiry #2: Ya, maybe a change is in order

I really put off starting this project for a few reasons. First of all, the course load for this program was substantially larger than I initially thought it would be. This meant I didn’t have all the extra time I expected to have. Secondly, I was working at my martial arts studio which also chewed into my free time. Lastly and most importantly I kept finding “reasons” not to work on it. Ultimately it came down to this: I didn’t want to do it. If I have learned anything about free inquiry this semester it is that for it to be effective, you have to really be interested in your topic. At the end of the day I was not feeling enthusiastic about the project so I made an executive decision.

TIME TO CHANGE TOPICS

So I took a gander at the list of previous topics for inspiration. This was initially just to give me an idea of which topics other people were choosing, but one in particular caught my eye. Disk Golf…

Strangely enough this topic did not even occur to me even though it was something that I started doing consistently this spring. This was an ideal choice of topics for me because I have continued to play and more importantly take pictures and recordings of my progress. I feel silly for not thinking of it sooner to be honest!

For each post I will be looking at different skills that I have worked on over the last few months and discussing my successes and failures along the way.

via GIPHY

One day… one day

Free Inquiry #1

Free Inquiry #1: Lofty Goals

So my Inquiry has been quite backlogged due to having switched midway through the semester. My original plan was a carpentry project. I wanted to make a storage pedestal for my fridge. This would have a twofold benefit:

  • it would give me a good place to store my onion and potatoes, this would be ideal because it would be a dark cool place
  • It would raise up the fridge so that the crisper is less difficult to get into

I saw a similar object for sale at Home Depot but the style did not match my appliances and home decor.

This is the Home Depot Raiser I found

Since I couldn’t find one that I liked I figured that I might as well make one myself with all the extra time I would have from being in online classes (how naΓ―ve I was).

This is one of the designs that I found,

This design from Designs from Studio C was almost exact what I needed with the exception of the depth which needed to be extended by 4 inches, The design came with a full materials list

MATERIALS:

  • 1-1/4β€³ pocket hole screws
  • 1-1/4” brad nails
  • Edge banding, optional
  • 2 sets ofΒ 24β€³ Drawer slidesΒ (<– affiliate link!)
  • Cabinet pulls
  • Wood glue
  • Sandpaper (100, 150, 220 grits)
  • Finishing supplies (primer & paint, or stain, sealer)

LUMBER:

  • 4 – 1Γ—3 at 8β€²
  • 1 – 3Γ—3 posts at 6β€²Β OR
  • 2 – 3Γ—3 posts at 3β€²
  • 2 – 4β€² x 8β€² sheets of 3/4β€³ plywood

CUT LIST:

  • 8 – 3Γ—3 posts at 14-1/4β€³ – Legs
  • 4 – 3/4β€³ plywood at 11-1/4β€³ x 23β€³ – Side Panels
  • 8 – 1Γ—3 at 23β€³ – Side Framing
  • 2 – 3/4β€³ plywood at 11-1/4β€³ x 22β€³ – Back Panels
  • 8 – 1Γ—3 at 22β€³ – Back Framing & Front Stretchers
  • 2 – 3/4β€³ plywood at 27β€³ x 28β€³ – Top
  • 2 – 3/4β€³ plywood at 19-1/2β€³ x 22-1/2β€³ – Drawer Box Bottom
  • 4 – 3/4β€³ plywood at 10β€³ x 22-1/2β€³ – Drawer Box Sides
  • 4 – 3/4β€³ plywood at 10β€³ x 21β€³ – Drawer Box Front & Back
  • 2 – 3/4β€³ plywood at 11β€³ x 21-3/4β€³ – Drawer Fronts

With all of this being detailed I figured that this would be easy as pie…. it was not. But that is a story for next time.